As an industry leader, Apple takes a unique approach to its features. While iPhones offer everything a user could need, some features are hidden, meaning they’re available but require a bit more effort to access and enable. For example, capturing a screenshot on your iPhone is straightforward, but starting a screen recording might be tricky for new users.
The good news is that recording your screen on an iPhone is just as simple as taking a screenshot or making a call once you know the right steps on how to screen record on iPhone. In this guide, let’s explore how to screen record on your iPhone and how to edit and share the clips afterward.
Steps to Turn On Your iPhone’s Screen Recording Option
All iPhones running iOS 11 or later come with a built-in screen recording feature. But before you start to use this feature you must make sure the screen recording button is in your Control Center. If the button is not present in the control center you need to add it. This will make it easier to start recording quickly whenever you need to.
Follow the below steps to add a screen recording button to your Control Center:
- Open your Control Center On iPhone X or later and swipe down from the top-right corner. If you use iPhone 8 or earlier version you need to swipe up from the bottom of the screen.
- Look for the screen recording button, which looks like a dot inside a circle. You can begin recording one you see the recording button.
- If it’s not there, go to Settings and then click Control Center and select Customize Controls.
- Scroll down to the “More Controls” section and find Screen Recording.
- Tap the green + symbol next to it and now the button will appear in the Included Controls section.
- If you want to remove it later, just tap the red – symbol.
How to Screen Record on an iPhone
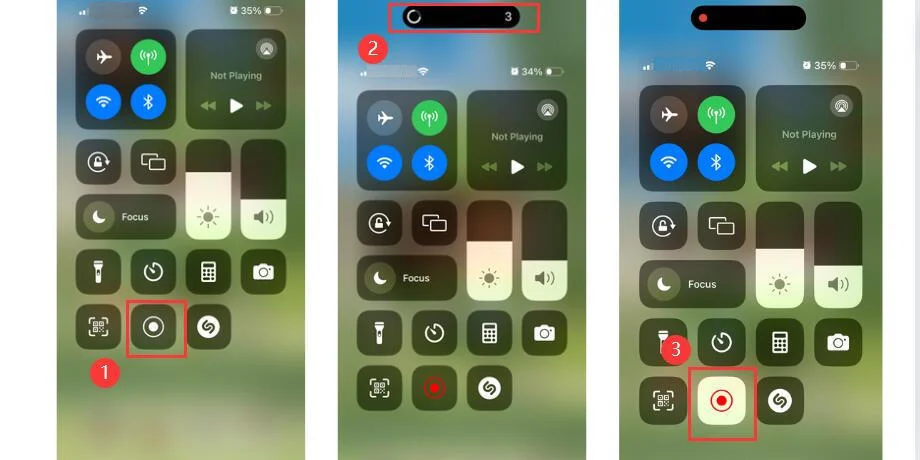
Once the screen recording button is added to your Control Center, you can easily start recording the video. The screen recording feature will capture everything happening on your screen, including any taps and swipes, along with sound if enabled. Below you can see how to do it:
- Open the Control Center by swiping down iPhone X or later or up iPhone 8 or earlier.
- After you tap the Record button, a three-second countdown will start, and your screen will turn red to indicate that the recording is in progress. On older iPhones, a red bar will be displayed at the top of the screen.
- To stop recording, you need to tap the red clock or bar at the top of the screen, then tap Stop.

Steps to Record with Audio on an iPhone
Would you like to record both your screen and voice? If so, you can turn on the microphone before you start. Here is how to do it:
- Press and hold the Record button in the Control Center.
- In the pop-up window, tap the Microphone icon at the bottom.
- After tapping Start Recording, a countdown will appear, and your microphone will be active during the recording.
- To turn off the microphone, repeat the same steps and tap the Microphone icon again to disable it.

Steps to Open and Edit Your Screen Recording
After you finish recording, you can find the video in your iPhone’s Camera Roll within the Photos app. From there, you can edit the video to trim the beginning or end, apply filters, or make other adjustments.
- Open the Photos app and find the screen recording in your Camera Roll.
- Tap the video and then tap Edit in the top right corner.
- Use the timeline at the bottom to adjust the beginning and end of the video. Drag the arrows to the right or left to trim the video.
- Play the video to see the changes, and keep adjusting until you are happy with the video.
- You can also apply filters or adjust settings just like you would with a photo.
- When you’re done editing, tap Done and select Save as New Clip.
This simple process allows you to record, edit, and share videos right from your iPhone, making it easy to capture important moments or tutorials.
When Can’t I Screen Record on iPhone?
Some apps, like streaming or banking, might prevent screen recording on iPhones to avoid recording sensitive or copyright information. If you attempt to screen record while using these apps, the recording may either stop or display a blank screen.
The Bottom Line
Screen recording with your iPhone is now made simple and convenient with the help of the steps mentioned above. Whether you’re capturing tutorials, gameplay, or important content, it’s easy to start recording. The process is straightforward and user-friendly, making it a handy tool for everyday use. You can also check out recording a call on iPhone.


1 Comment
Pingback: Taking Screenshot and Recording Screen on Mac - 2025